ADFS Federation Lab
Overview
Generating an ADFS Federation lab with adfs.py. This generator can create an enterprise ADFS server deployment with a Domain Controller. It can also add a full domain-joined enterprise Active Directory environment with users and Windows 10 Professional endpoints. This generator always adds a Microsoft Sentinel deployment with a Log Analytics workspace. The ADFS server automatically installs the Azure legacy monitoring agent with Sysmon and ADFS security auditing configuration, and will ship the logs into Sentinel via the agent. For each Windows 10 Pro system added, they will all have Sysmon installed, the legacy monitoring agent, and ship Sysmon logs to Sentinel.
Default Resources
To summarize, the following Azure resources are always created by default with this lab:
- One ADFS server joined to an AD Domain
- One DC
- One Sentinel deployment
Important Note
This generator lives in the generators/adfs directory. Navigate into this directory first.
cd generators/adfs
Manual Logging Configuration
To properly view the Sysmon and Windows event logs for security within Sentinel, it is necessary to take a few steps to configure the ADFS server and each Windows 10 system. After terraform runs, follow these steps to view logs in Sentinel.
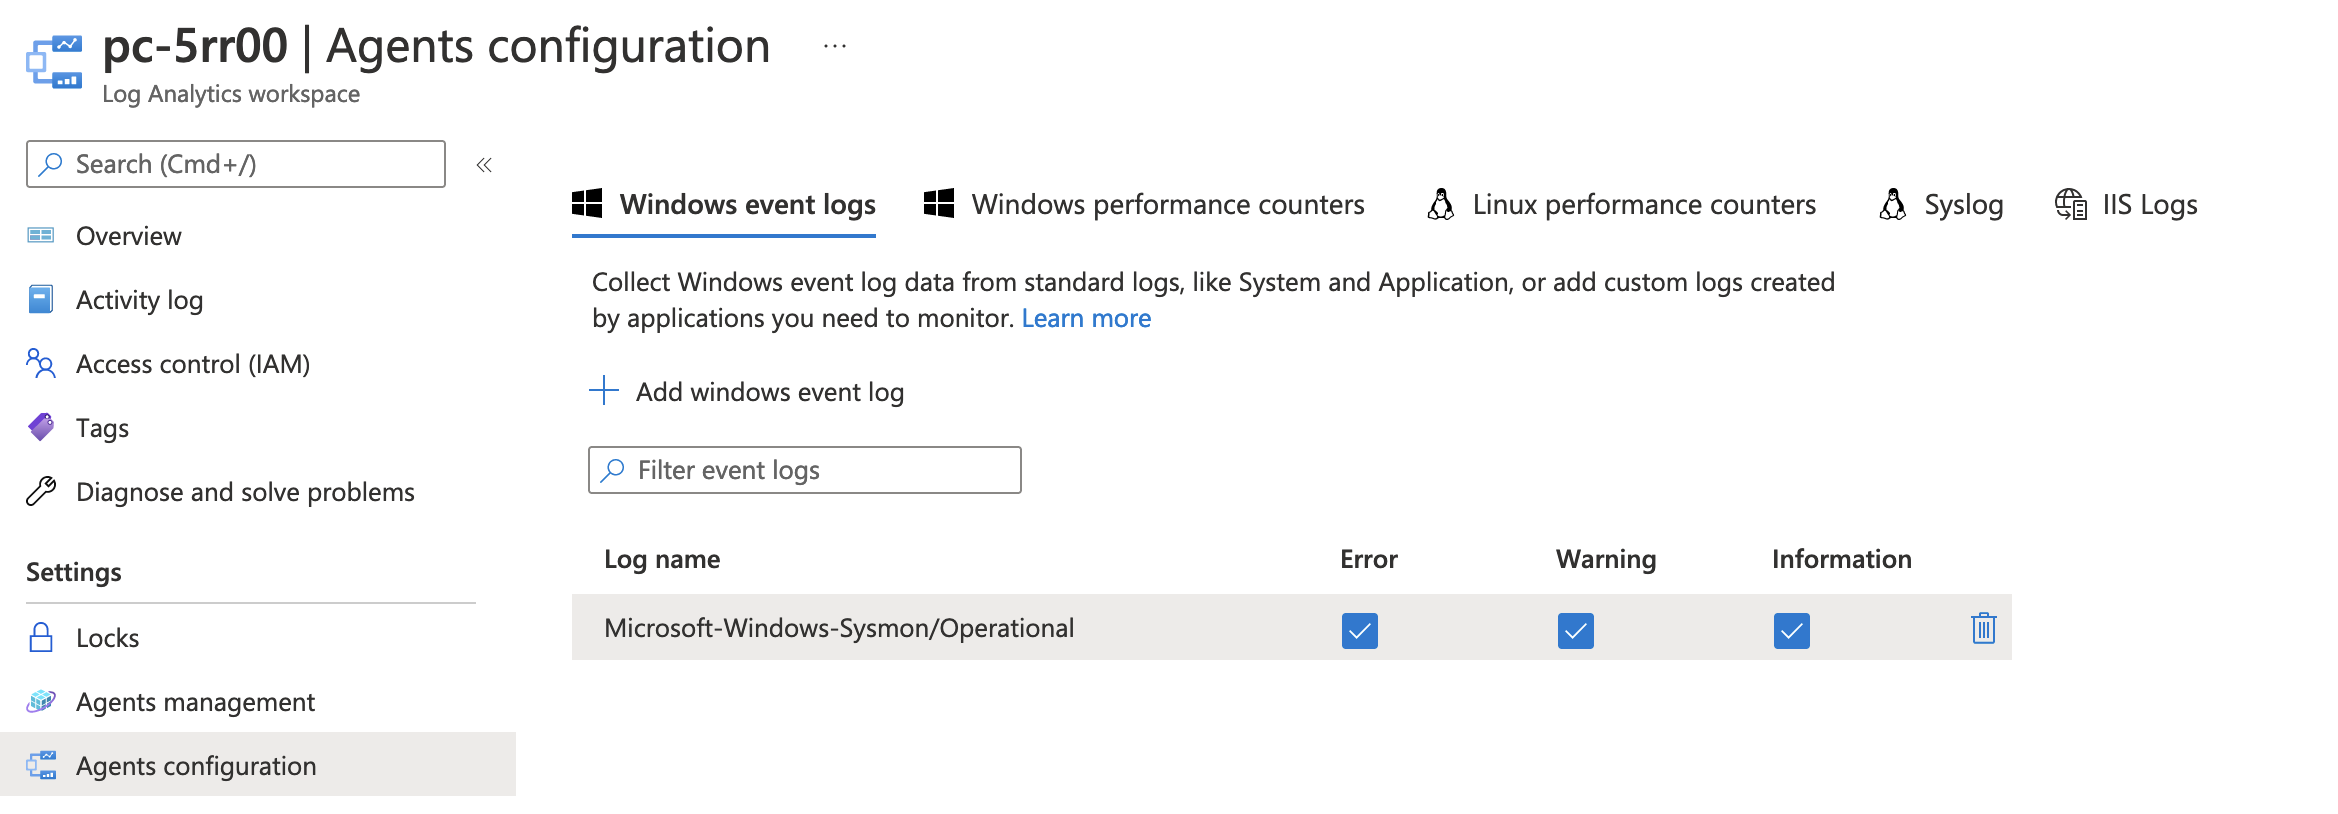
Step 1: Add Sysmon Channel in log analytics agents configuration
Navigate into the log analytics workspace and agents configuration. Select the add windows event log. Type Microsoft-Windows-Sysmon/Operational into the Log name input field and select Apply. The following screen shot shows how the configuration should look.
Microsoft-Windows-Sysmon/Operational
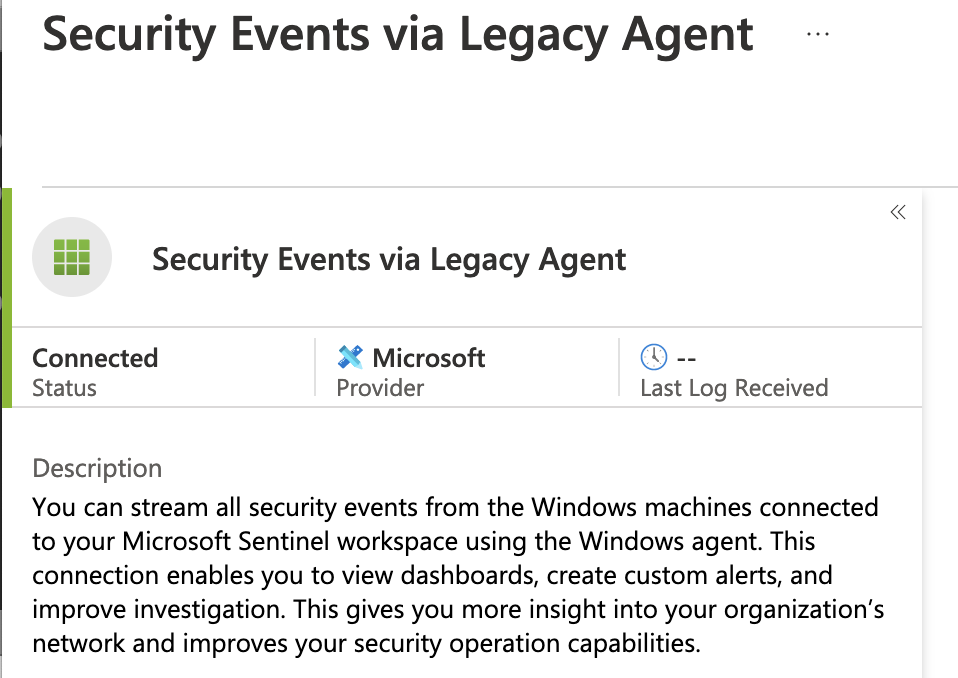
Step 2: Enable the Sentinel Data Connector - "Security Events via Legacy Agent"
Navigate into Sentinel. Find Data connectors under Configuration. In the search field or by scrolling below, find the connector named Security Events via Legacy Agent. Select open the connector page in the lower right hand corner. Select Common under which events to stream and Apply changes. Verify that the connector shows a green highlight and shows connected, as shown below.
Step 3: Reboot Virtual Machines and Verify connected in Agents Management
Verify that ADFS and all Windows 10 Virtual machines show as connected. Verify this by navigating into the Log Analytics workspace and looking under Agents management under settings. Reboot each of the Azure Virtual Machines and then look to verify that they all list a connected status. It should look like the following screen shot shown below.
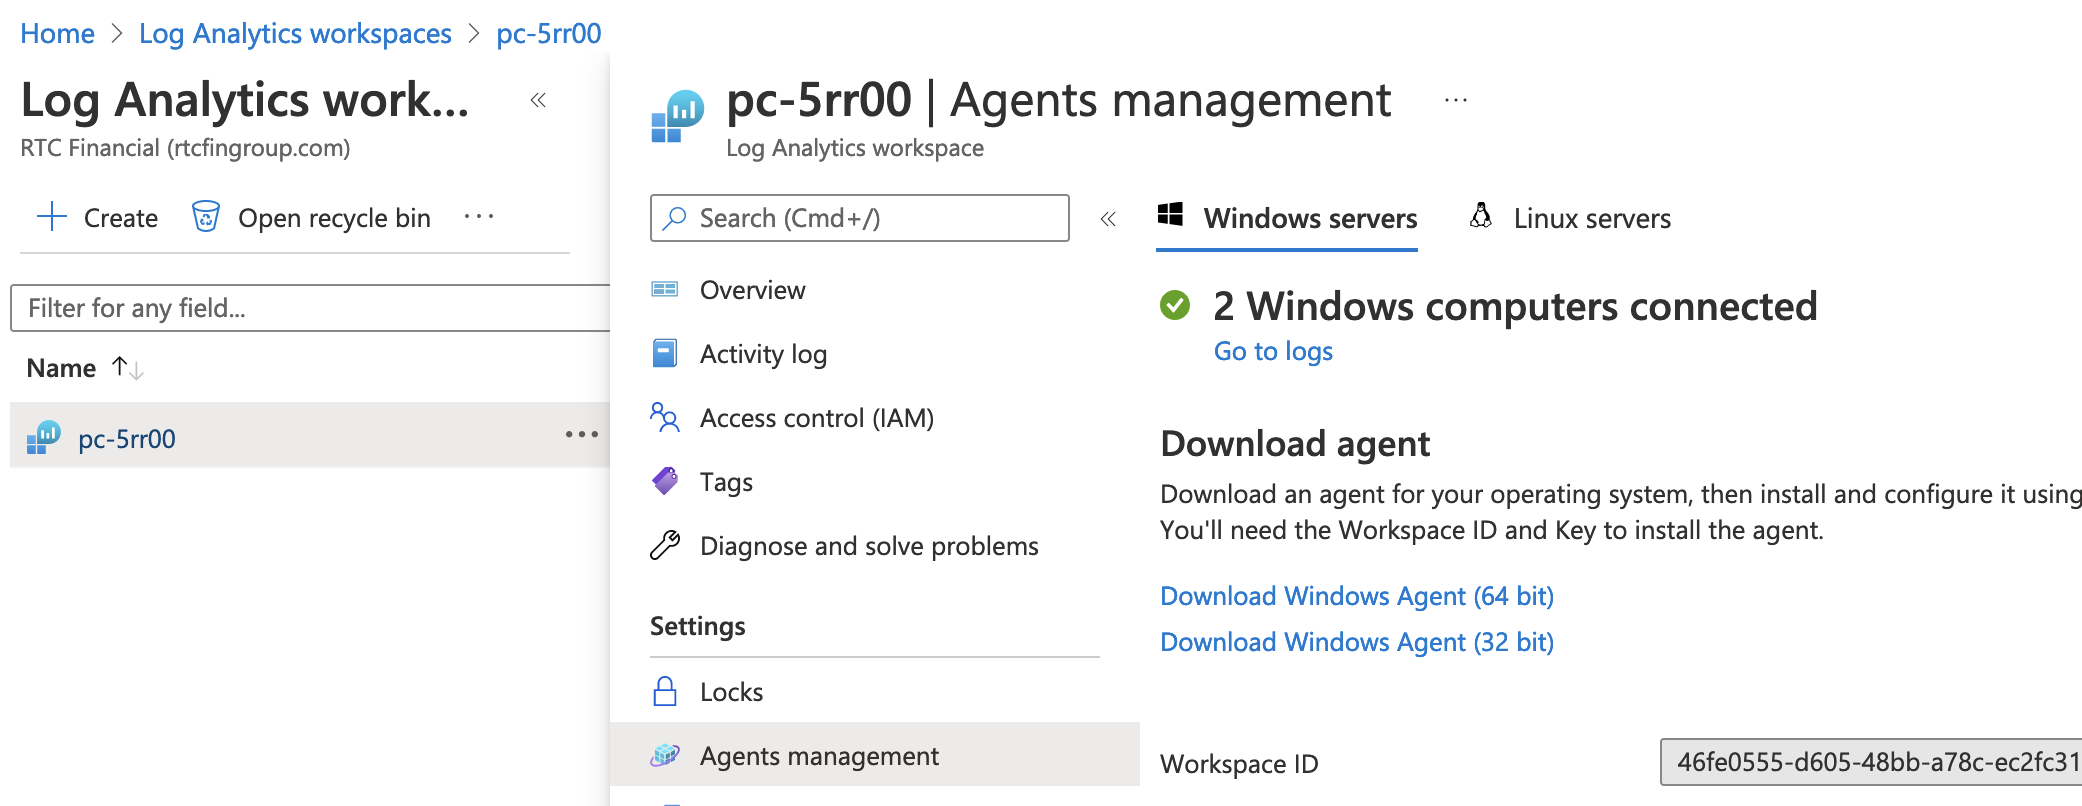
After the Virtual Machines reboot, you can navigate into the Sentinel overview page and start to see new Sysmon and Windows security event logs in the Overview. The Sysmon logs will show under EVENT table while the security event logs will show under the SECURITYEVENT table.
Usage Examples
Example 1: One ADFS Server and one Domain Controller, with self-signed ADFS certificate
python3 adfs.py
Description:
This will generate a lab with a single ADFS server and Domain Controller. The ADFS server will use a self-signed certificate. Five AD users will be created with a default AD domain of rtc.local. This generates the following terraform files:
-
adfs.tf: Terraform file defining ADFS configuration.
-
dc_adfs.tf: Terraform file defining the Domain Controller configuration.
-
main_adfs.tf: Terraform file with resource group and location.
-
network_adfs.tf: Terraform file with VNet and subnets.
-
nsg_adfs.tf: Terraform file with Network Security Groups.
-
providers.tf: Terraform file containing terraform providers.
-
sentinel_adfs.tf: Terraform file with Network Security Groups.
-
storage_adfs.tf: Terraform file containing sysmon and all other files used for configuration.
In addition to the above terraform files, a single file will be created with five AD users: ad_users.csv
Example 2: ADFS Server with DC. The ADFS Server will import a trusted, CA signed certificate.
python3 adfs.py --trusted_cert adfs.pfx --pfx_password password --ad_domain rtcsecurity.net
Description:
This will build an ADFS server and DC as described in example 1. In this example, a trusted, CA signed certificate is imported. The name of the certificate is passed in the parameter --trusted_cert. The format of the file is pfx, and the password used to protect the file is passed in the parameter --pfx_password. Finally, an AD Domain used to create AD is specified in the --ad_domain. The Azure Simuland project has a great guide on how to get a trusted CA signed SSL certificate:
https://github.com/Azure/SimuLand/blob/main/docs/environments/_helper-docs/getTrustedCASignedSSLCertificate.md
Example 3: ADFS + DC + Adding Windows 10 Professional (Randomly generate AD users)
python3 adfs.py --ad_domain rtcfingroup.com --admin RTCAdmin --password MyPassword012345 --endpoints 1 --domain_join --ad_users 500
Description:
This example builds an Active Directory domain of rtcfingroup.com on the DC. The ADFS server automatically joins to this AD domain and a self-signed certificate will be used to build ADFS. With --endpoints 1, one Windows 10 Pro system is created and it is set to join the domain with --domain_join. Finally, 500 AD users are randomly generated and added to the AD Domain, with assignment into AD Groups and OUs that are also created.
Example 4: ADFS + DC + Adding Windows 10 Professional (Import Custom Users from CSV)
python3 adfs.py --ad_domain rtcfingroup.com --admin RTCAdmin --password MyPassword012345 --csv users.csv --endpoints 1 --domain_join --ad_users 500
Description:
Same capabilities as above, except it can import a custom list of Domain Users into active directory on the DC instance. With the --csv users.csv, a file named users.csv is looked for in the working directory. The script checks to make sure that users are in the correct format. An example CSV showing five users is listed below:
name,upn,password,groups,oupath,domain_admin
Lars Borgerson,larsborgerson@rtcfingroup.com,MyPassword012345,IT,OU=IT;DC=rtcfingroup;DC=com,False
Olivia Odinsdottir,oliviaodinsdottir@rtcfingroup.com,MyPassword012345,IT,OU=IT;DC=rtcfingroup;DC=com,True
Liem Anderson,liemanderson@rtcfingroup.com,MyPassword012345,IT,OU=IT;DC=rtcfingroup;DC=com,False
John Nilsson,johnnilsson@rtcfingroup.com,MyPassword012345,IT,OU=IT;DC=rtcfingroup;DC=com,False
Jason Lindqvist,jasonlindqvist@rtcfingroup.com,MyPassword012345,IT,OU=IT;DC=rtcfingroup;DC=com,True
Details
Updating Files Automatically Used
There are a few important files that are used in the range that are automatically uploaded and downloaded to resources. They can be easily customized.
-
Sysmon.zip: This range includes Sysmon version 14. It lives in
shared/Sysmon.zip. This file gets pushed to a storage container where the ADFS server and all Windows 10 endpoints download it. You can replace it for customizations. -
AzureADConnect.msi: This range includes version 2.x of AzureADConnect MSI installer. It lives in
shared/AzureADConnect.msi. This file gets pushed to a storage container where the ADFS server and DC both download it to the local Administrator desktop. You can replace it for customizations. -
sysmonconfig-export.xml: The sysmon configuration file gets uploaded to a storage container and downloaded by the ADFS server and all Windows 10 endpoints. It lives in
files/sysmon/sysmonconfig-export.xml.
Advanced Command Line
--endpoints <num_of_endpoints>: Number of Windows 10 Professional systems to build (Default: 0)
--resource_group <rg_name>: Name of the Azure resource group to automatically create (Default: PurpleCloud)
--location <location>: The Azure location to use (Default: eastus)
--ad_domain <domain>: The name of the AD Domain to provision (Default: rtc.local)
--ad_users <num_of_domain_users>: The number of AD users to automatically build (Default: Disabled)
--csv <csv_file>: A custom CSV file to use that will load domain users on the DC's AD DS (Default: Disabled)
--admin <admin_username>: The Local Administrator account (Default: RTCAdmin)
--password <password>: The local Administrator password and default AD user password (Default: auto generate a strong password)
--domain_join: Join the Windows 10 Pro systems to the AD Domain (Default: false)
--auto_logon: Automatically logon the domain user with their credentials upon system start (Default: false)
--data_connector_office: Enable the Sentinel Data Connector for Office (Default: false)
--data_connector_aad: Enable the Sentinel Data Connector for Azure AD (Default: false)
--trusted_cert <file.pfx>: Import at trusted, CA signed certificate into ADFS (Default: disabled, self-signed)
--pfx_password <password>: The password used to import the pfx file (Default: disabled, self-signed)
Customizing ADFS
The ADFS server can be easily customized using powershell bootstrap scripts. The location of these scripts is files/adfs. What the files do:
-
bootstrap-adfs.ps1.tpl: This is the main script that installs symon. It downloads the
install_adfs.ps1script from the storage container and thedomain_join.ps1script from the storage container. If the domain_join setting is true, it will set up a powershell scheduled job to launch the domain_join.ps1 script. -
domain_join.ps1.tpl: This joins the system to the AD domain. It runs as a Powershell Scheduled Job and should de-register after domain join is detected as true.
-
install_adfs.ps1.tpl: Installs the ADFS components and services. It will by default generate a self-signed certificate. If the trusted, CA signed certificate option is enabled, it will download the certificate from the storage container. Finally, it configures ADFS Security auditing log configuration.
How AD Builds on the DC
Some notes I've gathered on AD usage and building.
-
Azure AD Connect: The Azure AD connect MSI is included in ths repo. It can be upgraded by replacing the file in
shared/AzureADConnect.msi. The current version is 2.x of AD Connect. The file is uploaded to the storage container and then downloaded to the local Administrator's desktop. -
The bootstrap script for building Active Directory is contained in
files/dc/bootstrap-dc.ps1.tpl. This script is used to build AD DS on the dc instance created in dc.tf. -
After terraform runs, the actual rendered dc bootstrap script (with variables) is output to
output/dc/bootstrap-dc1.ps1.For troubleshooting you can copy that script to the DC and run it. -
The way AD users, groups, and OUs are added: In the CSV file, there is a field for
oupath. The string for theOU=is looked at and a new OU is created if it hasn't already. This is the way new OUs can be added. AD users are added to that specific OU when they are created. For adding AD Groups, the CSV field forgroupsis examined. The user is added into that AD group. ThegroupsandOU=portion of the oupath should match. If they don't, problems could arise adding the user. -
The
ad_users.csvfile is the name of the file that the DC uses to build AD. It is uploaded to the storage container that is created and downloaded automatically by the DC. Look inC:\terraform\ad_users.csvto look at this file if needed. -
When using the
--csv <file1>to specify your own AD users CSV, how this works: That file is copied toad_users.csvand it is uploaded to the storage container, and downloaded to the DC. Same as above, it is copied into C:\terraform\ad_users.csv where the bootstrap script parses it. -
For auto_logon domain users: An AD domain user is randomly selected for logging on that Windows 10 Pro endpoint. To customize which domain user is used, you can manually edit the windows 10 terraform file (i.e., win10-1.tf).
Edit script options in adfs.py
Windows 10 Pro configuration: The Windows 10 Pro default configuration can be adjusted to meet your needs.
These are located in the config_win10_endpoints dictionary:
hostname_base: The base Windows 10 hostname (Default: win10)
join_domain: Whether to join the Windows 10 Pro to the AD Domain. This is disabled by default. So if you add a DC and want to join the Windows 10 Pro systems to the AD Domain, you can set this to true. Or you can use the command line parameter --domain-join.
auto_logon_domain_users: Configure the endpoint (via registry) to automatically log in the domain user. This will randomly select an AD user. Disabled by default and requires domain join and DC.
install_sysmon: Automatically install Sysmon with Swift on Security configuration (Default: Enabled)
install_art: Install Atomic Red Team (art). (Default: Enabled)
config_win10_endpoint = {
    "hostname_base":"win10",
    "join_domain":"false",
    "auto_logon_domain_user":"false",
    "install_sysmon":sysmon_endpoint_config,
    "install_art":"true",
}
Default AD Users: There is a python dictionary specifying the default AD users. This can be changed to suit your needs. These are the first five users automaticaly created. After the first five, users are randomly generated to meet the --ad_users <number> amount.
Here is the default_ad_users list along with the first user, that can be searched for in the file:
default_ad_users = [
    {
        "name":"Lars Borgerson",
        "ou": "CN=users,DC=rtc,DC=local",
        "password": get_password(),
        "domain_admin":"",
        "groups":"IT"
    },
Network Subnets configuration: The configuration for the subnets can be adjusted in the python list named config_subnets. Some changes include changing the default subnet names or adding/removing subnets. By default there are four subnets created.
Other Details:
- ranges.log: The ranges.log file writes out important information as the range is built, such as VM details. You can use it to track things. The ranges.log will output some important information such as your ADFS endpoint for signon, as shown below:
[+] Creating the adfs terraform file:  adfs.tf
  [+] ADFS Server Information:
  [+] Server Hostname:  adfs
  [+] FQDN:  adfs.rtc.local
  [+] Signon Endpoint:  https://adfs.rtc.local/adfs/ls/idpinitiatedsignon.aspx
  [+] Building with Self-Signed certificate
-
Logging Passwords: By default, all passwords are randomly generated. So if you are not aware of this, it might be easy to lose track of a password. For this reason we have added a logging feature that captures all passwords created. The
ad.pyscript will automatically log all output to a logfile calledranges.log. This is for the specific purpose of being able to track the ranges created and the passwords that are auto-generated for AD users and local Administrator accounts. You can also typeterraform outputas a secondary way to get the password and details for each virtual machine. -
Azure Network Security Groups: By default, a terraform data http resource will auto-detect your public IP address using a request to http://ifconfig.me. Your public IP address will be used to white list the Azure NSG source prefix setting. If you change locations and your IP address changes, simply type
terraform applyand the NSG white-listed public IP address should update through terraform.
locals {
  src_ip = chomp(data.http.firewall_allowed.response_body)
  #src_ip = "0.0.0.0/0"
}
Terraform Outputs
You can get the details of each Virtual Machine, including passwords, by typing terraform output. The terraform outputs will also show the ADFS endpoint for signon. You can RDP into the machine and test it locally with a browser. You can also access the endpoint over the public Internet when importing a trusted, CA signed certificate.
Demo
A video demonstration of building an ADFS Federation lab with options and illustrations.